
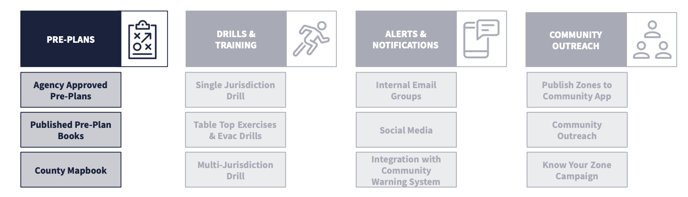
Pre-planning reduces agencies’ reflex time during an incident & ensures that teams are always ready for action.
Use agency-approved zones as a starting point to create agency-approved pre-plans.
Create Dynamic Evacuation Pre-Plans with Genasys Protect EVAC
EVAC provides a consistent model for the creation and maintenance of zone-based evacuation pre-plans. A pre-plan is designed to capture the latest “hyper-local” information about a zone. The key is to get the people involved together to assemble as much local knowledge as possible. In other words, what do fire and law need to know about the zone in order to provide effective mutual aid during an evacuation? That information should make up your pre-plans.
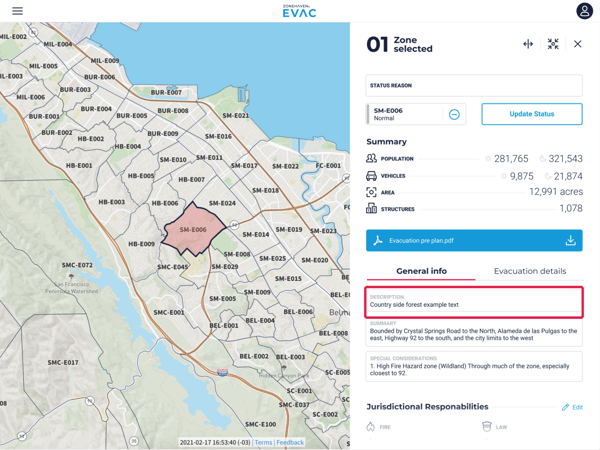
An EVAC pre-plan currently consists of two pages.
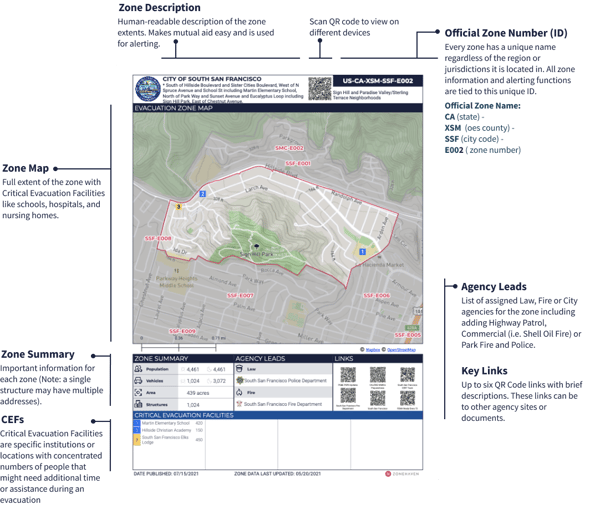
Page 1 displays a detailed map of a zone and includes zone-specific details, such as critical evacuation facilities, structure counts, populations, and affiliated agencies.
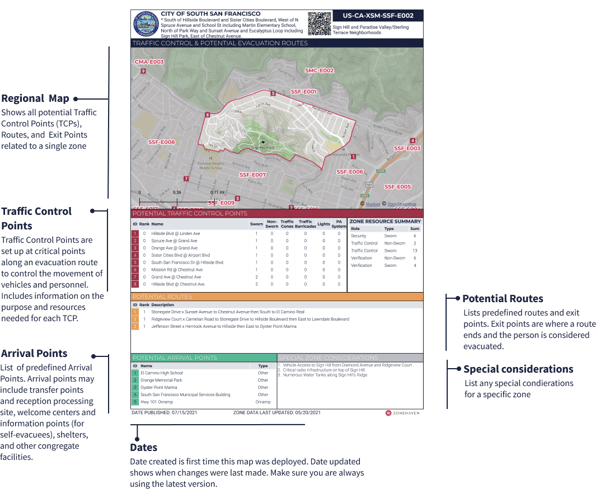
Page 2 provides a more regional context and details of traffic control points and evacuation routes.
Note: The zones are agency-approved at this point.
Evacuation Pre-Planning - A Step-by-Step Guide
In the following section, we will dive deeper into the steps involved in creating an evacuation pre-plan for a given region. Before we begin,
- Login to app.zonehaven.com using your credentials. (How to Login?)
- Make sure you have Editor permissions.
- Print out copies of the Pre-Planning Checklist and keep them handy.
Pre-Planning is Collaborative
Collaborate with various stakeholder agencies, including law, fire, OES & the emergency preparedness department. Multi-agency teams with representatives from each of the stakeholder agencies need to come together for effective pre-planning.
Step 1: Select the zone(s) you want to work with.
Tip: You can select more than one zone. The information will be collated and displayed.
Step 2: Update the Commonly Known As and Zone Boundaries for the selected zone(s).
Update the Commonly Known As and Zone Boundaries for each zone. The Commonly Known As section is where you should put the neighborhood name or the name commonly used for the area by the community. The Zone Boundaries are automatically filled to denote the boundaries of the zone. Make sure the double check these boundaries are accurate and update them if necessary.
Step 3: Add Arrival Points.
Under the Evacuation Details tab, add Arrival Points.
Arrival Points refer to a variety of locations where evacuees can be sent. May include transfer points and reception processing sites, welcome centers and information points, shelters, and other congregate facilities. Arrival Points are generally considered safe areas when reached.
Types of Arrival Points:


Note: Arrival Points are displayed and listed on the PDF Evacuation Pre-Plan. They are not shown in the Genasys Protect community site until they are activated during an emergency.
Step 4: Add Critical Evacuation Facilities.
Under the Evacuation Details tab, add Critical Evacuation Facilities.
Critical Evacuation Facilities (CEFs) are specific institutions or locations with concentrated numbers of people that might need additional time or assistance during an evacuation. (ex. churches, schools, etc.)
Types of CEFs:


Step 5: Analyze Traffic Load. Add & Rank Traffic Control Points.
Genasys Protect EVAC provides a simple tool to understand traffic loads per intersection, based on the number of addresses, and estimates of vehicles, by zone.
Traffic Control Points (TCPs) or Access Control Points are set up at critical points along an evacuation route to control the movement of vehicles and personnel.
Note: Road Closures are a type of TCP that can be made community-visible
Types of TCPs:


Step 6: Add Evacuation Routes
Once you have the Arrival Points, you can define a set of potential paths evacuees may take in order to reach the defined Arrival Points depending on the threat direction. These are only for internal agency use and cannot be made visible to the public.
Step 7: List Evacuation Resources
Evacuation Resources represent additional officers (sworn or non-sworn) that should be part of a standing request for resources in order to support evacuation verification (house to house) and ensure the security of a given zone.
These can also be businesses, social service agencies, recreation areas and other places that provide essential services.
Step 8: Add Zone Links
Zone links are the links to any information that is required to conduct an evacuation, such as agency websites, phone lists, CERT program details, etc.
Tip 1: Zone links can be made community visible
Tip 2: You can add any number of links for a zone and up to six QR Code links with brief descriptions.
Step 9: Publish Zones on Genasys Protect
Once you have the plan ready, the information can be fed into the EVAC application by your team or by Genasys. Then you can go ahead and make the zones public.
Note: Only Editors & Administrators can perform this action.
Step 10: Make the Pre-Plan Accessible to Teams
The two-page pre-plan can be easily downloaded or shared with team members via a QR code. The same can be accessed online and offline through the EVAC application.
It is advised to print booklets of the pre-plan for the team to keep in their trucks and for running training and drills.
Congratulations!
Your pre-plan is ready to be shared and used. Next, learn about how you can create incident scenarios and fire simulations within minutes using EVAC.
Go to the Run Fire Simulations guide.