
This article details the process of splitting and merging zones.
Table of Contents
Temporary Zones
Temporary zones are subsections of a zone used during an evacuation or repopulation to adjust the boundaries of zones so an area can be evacuated or repopulated without impacting the entire zone. Temporary zones retain the original zone ID to reduce confusion among residents, but have an additional letter attached to the end so they are easily distinguishable.
Splits
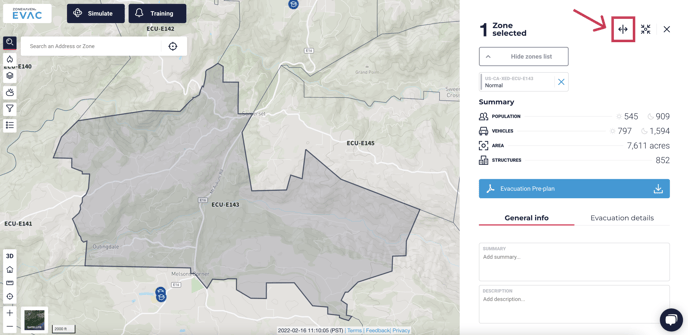
To create two temporary zones using the split tool, select the zone you wish to split and click the ![]() button in the top right corner of the zone details panel.
button in the top right corner of the zone details panel.

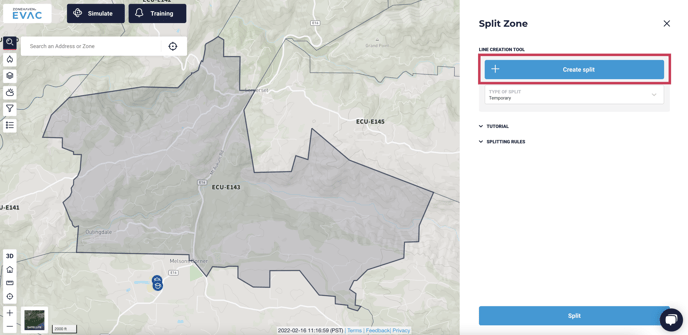
Be sure ‘Temporary’ is selected as the type of split, then click the ‘Create split’ button.

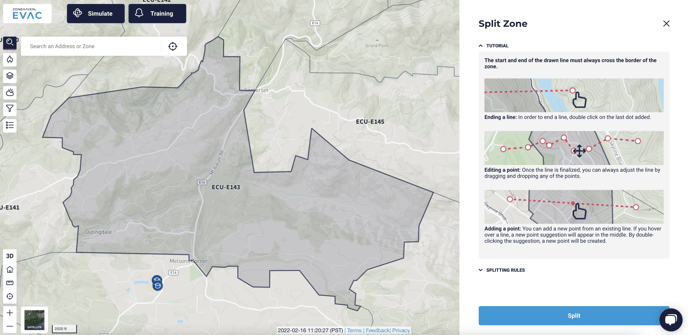
You can find instructions for how to draw the split line under the ‘Tutorial’ section.
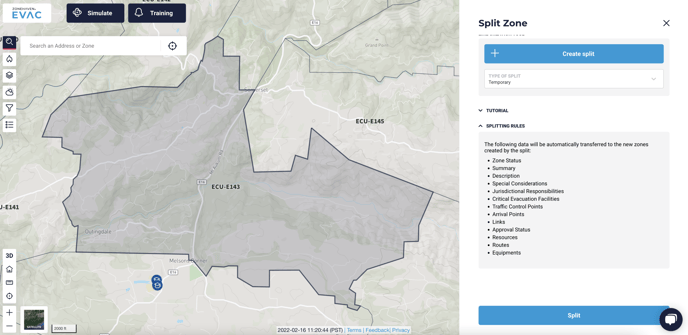
 Under the ‘Splitting Rules’ section, you will find a list of the data that will be automatically transferred to the new zones during the split.
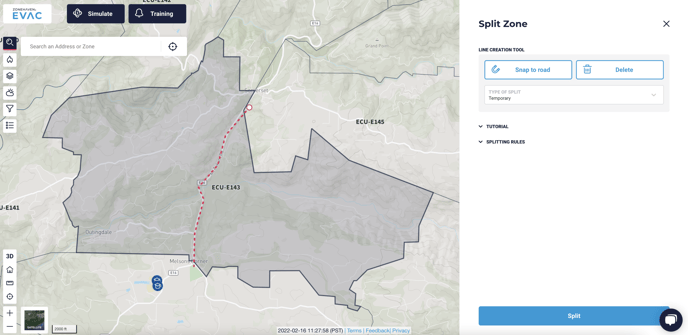
Start your line by clicking just outside the zone boundary, then clicking again to add a point wherever you wish to change the direction of the line. Make sure the last point is outside the zone so the line crosses the zone boundaries on either end. To stop drawing, click again on the last point you added to your line.

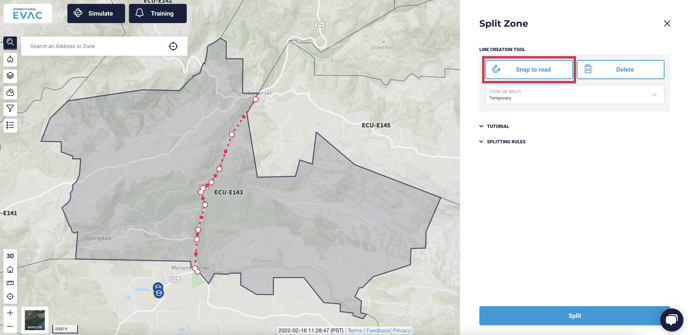
If you wish to split the zone along a road, draw your line to approximate the path of the road, then use the ‘Snap to road’ button. This will automatically align your split line with the road. Double check the ends of your line still cross the zone boundaries before completing the split.

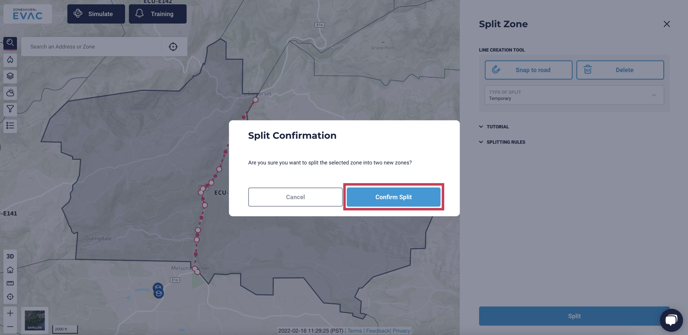
When you are satisfied with your line and ready to split the zone, click the blue ‘Split’ button at the bottom of the screen. You will then be asked to confirm you wish to split the zone. Click the ‘Confirm Split’ button.

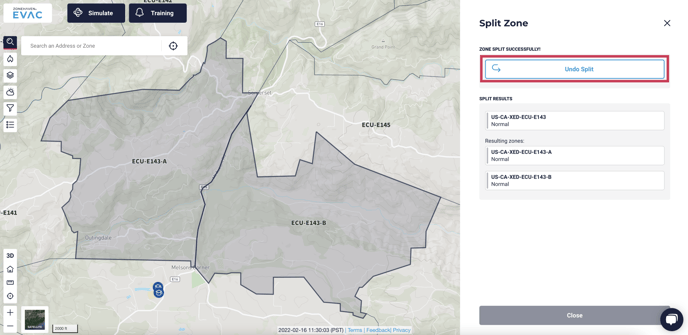
Once the split has been completed, you will be able to see the new zones in the map, as well as in the side panel. The split results will show you the original zone and the resulting zones. If you wish to reverse the split, use the ‘Undo Split’ button at the top of the side panel.

If you are happy with the split, click the ‘Close’ button at the bottom of the side panel. You will then be asked to confirm that you wish to leave the split screen and informed that if you leave the page you will have to manually merge the zones back together to undo the split. If you wish to continue, click the ‘Close’ button.

Merges
To merge two zones into a larger temporary zone, select the two zones you wish to merge and click the ![]() button in the top right corner of the screen. To create a temporary zone through merging, at least one of the zones you select must be a temporary zone. If either zone is permanent, it will need to be unpublished before you can merge.
button in the top right corner of the screen. To create a temporary zone through merging, at least one of the zones you select must be a temporary zone. If either zone is permanent, it will need to be unpublished before you can merge.
Note: If you are trying to merge two temporary zones back into their original permanent zone, you will need to follow the steps outlined in the Permanent Zones - Merges section.
%20-%20Image%201.png&size=1666499&width=1383&height=675&alt=)
%20-%20Image%201.png?width=688&name=Zone%20Merge%20(Temporary)%20-%20Image%201.png)
Be sure ‘Temporary’ is selected as the type of merge. The summary and special considerations of the two selected zones will be automatically merged (if there is any data in those fields) and will appear in the boxes in the side panel. Review the information in these fields to make sure it describes the single zone you will be creating with this merge.
%20-%20Image%202.png&size=1657865&width=1383&height=675&alt=)
%20-%20Image%202.png?width=688&name=Zone%20Merge%20(Temporary)%20-%20Image%202.png)
The data listed below the summary and special considerations fields will be automatically merged into the new zone. The rest of the data not included in the list, including the zone ID, will be taken from one of the zones and applied to the new zone. Select the zone whose data you wish to retain from the drop-down menu at the bottom of the side panel.
%20-%20Image%203.png?width=688&name=Zone%20Merge%20(Temporary)%20-%20Image%203.png)
%20-%20Image%203.png&size=1632833&width=1383&height=675&alt=)
When you have finished reviewing the data, click the ‘Merge’ button at the bottom of the side panel. You will be asked to confirm that you wish to create a new zone by merging the selected zones. Click ‘Confirm Merge’ to continue.
%20-%20Image%204.png&size=1249918&width=1383&height=675&alt=)
%20-%20Image%204.png?width=688&name=Zone%20Merge%20(Temporary)%20-%20Image%204.png)
Once the merge has been completed, you will be able to see the new merged zone in the map, as well as in the side panel. The merge results will show you the original zones and the resulting zone. If you wish to reverse the merge, use the ‘Undo Merge’ button at the top of the side panel.
%20-%20Image%205.png&size=1578700&width=1383&height=675&alt=)
%20-%20Image%205.png?width=688&name=Zone%20Merge%20(Temporary)%20-%20Image%205.png)
If you are happy with the merge, click the ‘Close’ button at the bottom of the side panel. You will be asked to confirm that you wish to close the merge screen, since the merge cannot be undone except by manually splitting the zone again. If you wish to continue, click the ‘Close’ button.
%20-%20Image%206.png?width=688&name=Zone%20Merge%20(Temporary)%20-%20Image%206.png)
Permanent Zones
Generally, permanent zones are split and merged during the onboarding process when a new customer is adjusting the boundaries of their zones before they are published to the community. To split or merge permanent zones, they must be unpublished, since changing a permanent zone has a community impact. Permanent zones are meant to be as static as possible once they’re published so the community can find their zone and not have to relearn it.
Splits
To split a zone into two new permanent zones, select the zone you wish to split and click the ![]() button.
button.
%20-%20Image%201.png&size=1706868&width=1383&height=675&alt=)
%20-%20Image%201.png?width=688&name=Zone%20Split%20(Permanent)%20-%20Image%201.png)
Be sure ‘Permanent’ is selected as the type of split, and assign each of the resulting zones a unique zone ID. (If the zone ID is already in use, red lettering will appear under the field when you click ‘Split’ and you will be required to input a different ID.) Click the ‘Create split' button to start drawing your line.
%20-%20Image%202.png?width=688&name=Zone%20Split%20(Permanent)%20-%20Image%202.png)
%20-%20Image%202.png&size=1579246&width=1383&height=675&alt=)
Under the ‘Tutorial’ section, you can find instructions about drawing the split line.%20-%20Image%203.png&size=1889506&width=1383&height=675&alt=)
%20-%20Image%203.png?width=688&name=Zone%20Split%20(Permanent)%20-%20Image%203.png)
Under the ‘Splitting Rules’ section, you can find information about the data that will be transferred to the new zones.%20-%20Image%204.png&size=1740704&width=1383&height=675&alt=)
%20-%20Image%204.png?width=688&name=Zone%20Split%20(Permanent)%20-%20Image%204.png)
Start your line by clicking just outside the zone boundary, then click again to add a point whenever you wish to change the direction of the line. Make sure the last point is outside the zone so the line crosses the zone boundaries on either end. To stop drawing, click again on the last point you added to your line.
%20-%20Image%205.png&size=1684262&width=1383&height=675&alt=)
%20-%20Image%205.png?width=688&name=Zone%20Split%20(Permanent)%20-%20Image%205.png)
If you wish to split the zone along a road, draw your line to approximate the path of the road, then use the ‘Snap to road’ button. This will automatically align your split line with the road. Double check the ends of your line still cross the zone boundaries before completing the split.
%20-%20Image%206.png&size=1784528&width=1383&height=675&alt=)
%20-%20Image%206.png?width=688&name=Zone%20Split%20(Permanent)%20-%20Image%206.png)
Once you have finished drawing your line, click the ‘Split’ button. If your zone IDs are not unique, you will need to change them and try again. You will be asked to confirm that you wish to split the zone into two new zones. It’s a good idea to double check your zone IDs and the split line. Click ‘Confirm Split’ to continue.
%20-%20Image%207.png&size=1648826&width=1383&height=675&alt=)
%20-%20Image%207.png?width=688&name=Zone%20Split%20(Permanent)%20-%20Image%207.png)
Once the split has been completed, you will be able to see the new permanent zones in the map, as well as in the side panel. Again, it’s a good idea to double check your zone IDs. If you wish to reverse the split for any reason, click the ‘Undo Split’ button.
%20-%20Image%208.png&size=2166813&width=1383&height=675&alt=)
%20-%20Image%208.png?width=688&name=Zone%20Split%20(Permanent)%20-%20Image%208.png)
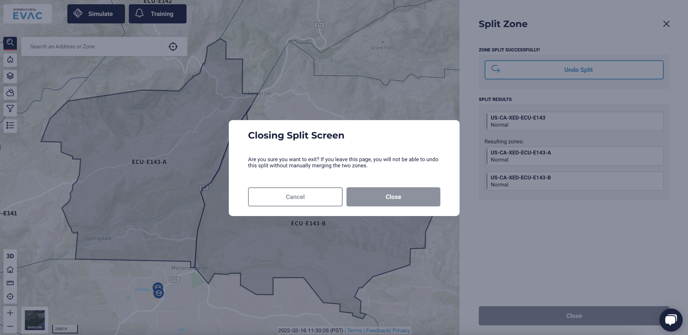
If you are satisfied with the split, click the ‘Close’ button at the bottom of the side panel. You will be asked to confirm that you wish to close the split screen, and informed that you will not be able to undo the split without manually merging the zones back together. If you wish to proceed, click the ‘Close’ button.
%20-%20Image%209.png?width=688&name=Zone%20Split%20(Permanent)%20-%20Image%209.png)
%20-%20Image%209.png&size=1570389&width=1383&height=675&alt=)
Merges
To create a permanent zone using the merge tool, select the two zones you wish to merge and click the ![]() button in the top right corner of the side panel.
button in the top right corner of the side panel.
If you have selected two temporary zones, you will have to choose ‘Permanent’ as the type of merge. If you have selected two permanent zones, the merge will automatically create a permanent zone. If you have selected one temporary and one permanent zone, you will need to select the permanent zone from the drop-down at the bottom of the side panel for the resulting zone to be permanent, since the type of zone is retained.
%20-%20Image%201.png&size=1670911&width=1383&height=675&alt=)
%20-%20Image%201.png?width=688&name=Zone%20Merge%20(Permanent)%20-%20Image%201.png)
The summary and special considerations of the two selected zones will be automatically merged (if there is any data in those fields) and will appear in the boxes in the side panel. Review the information in these fields to make sure it describes the single zone you will be creating with this merge.
The data listed below the summary and special considerations fields will be automatically merged into the new zone. The rest of the data not included in the list, including the zone ID, will be taken from one of the zones and applied to the new zone. Select the zone whose data you wish to retain from the drop-down menu at the bottom of the side panel.
%20-%20Image%202.png&size=1653618&width=1383&height=675&alt=)
%20-%20Image%202.png?width=688&name=Zone%20Merge%20(Permanent)%20-%20Image%202.png)
When you have finished reviewing the data, click the ‘Merge’ button at the bottom of the side panel. You will be asked to confirm that you wish to create a new zone by merging the selected zones. Click ‘Confirm Merge’ to continue.
%20-%20Image%203.png&size=1271691&width=1383&height=675&alt=)
%20-%20Image%203.png?width=688&name=Zone%20Merge%20(Permanent)%20-%20Image%203.png)
Once the merge has been completed, you will be able to see the new merged zone in the map, as well as in the side panel. The merge results will show you the original zones and the resulting zone. If you wish to reverse the merge, use the ‘Undo Merge’ button at the top of the side panel.
%20-%20Image%204.png&size=1572249&width=1383&height=675&alt=)
%20-%20Image%204.png?width=688&name=Zone%20Merge%20(Permanent)%20-%20Image%204.png)
If you are happy with the merge, click the ‘Close’ button at the bottom of the side panel. You will be asked to confirm that you wish to close the merge screen, since the merge cannot be undone except by manually splitting the zone again. If you wish to continue, click the ‘Close’ button.
%20-%20Image%205.png&size=1203540&width=1383&height=675&alt=)
%20-%20Image%205.png?width=688&name=Zone%20Merge%20(Permanent)%20-%20Image%205.png)
If you have any questions, contact us at support@genasys.com.